Thursday, September 5, 2013

Thursday thoughts.

I just wanted to mention to my "Get your Hex on" buddies that I posted instructions on my website @ http://notionnanny.com/Get_your_Hex_On__Hive_1.html for my September block.

I had a great time with my friends yesterday.  As promised here are their quilts!
Sheila, who I thought was doing the same quilt as mine, ( the one I posted yesterday) finished another quilt from the same book. The one like mine is her next commitment which ends December 31.


Carolyn's quilt was not only pieced and appliquéd, but quilted and the binding was sewn on. She sewed it down while we were visiting!

My friend BJ's, quilt which isn't quilted because she is waiting for me to have time to do it!  LOL

Our next challenge is to be finished by December 31. Sheila is off to Amsterdam, so we are taking the extra time so we can finish something we just started!.   I have my choice of about 10 different projects and haven't figured out yet which one it will be.

Today I was going to sew, but decided to make perogies instead. Maybe tonight!

Wednesday, September 4, 2013

Whats on the "sewing' Menu for today.

It's Wednesday and I try to spend the morning in my sewing room. The afternoon is usually saved for my sewing day with some friends.

I am dragging myself back to normal after last months disasters so I am headed to the sewing room in a bit to cut fat quarters for my friends, and maybe sew a little... I will let you know how I make out.

I challenged my little group of friends to finish a project they had started and today is the windup! If you finish you receive a fat quarter from everyone. If you don't finish you get nothing! Well... I will get nothing this month again!, because I didn't' get finished.

A few years ago I bought this book...

I loved the little quilt on the front and I started making it. It was my challenge, and although I have all the flowers made for the appliqué, I still have about 100 leaves to make and attach.... boo who!


I am going to start the leaves this afternoon and hopefully I will get this finished soon...


And just in case you are wondering here is a picture of the hexagon template and the template for the leaves next to a quarter.


Very very small! I will keep in touch so you can see my progress!  My friend Sheila has made the same quilt only using 1" hexagons... I think it is her finish for today... I will get a picture of them side by side...

On a lighter note... yesterday was the first day of school for my two grade 2 Grandchildren. I have tried to make it a tradition to take them each out for their first day of school. We usually go for super and a treat, but things are a little different now so we only got to go for the treat after supper... we had so much fun. they make me smile!


Tonight, its the two senior kindergarten kids... that should be fun!

Tuesday, September 3, 2013

How to Make Hexagons

Tutorial Tuesday 


Today I am going to do a brief tutorial on how I make hexagons!


The Templates – 1 inch


1. I like to print my hexagons from EQ7. Here is how...
    a.  Go to new… Quilt… one patch.
    b.  I make sure the length of the patch is 1” and I add rows, width and length until the quilt measures 5.00 x 8.66 ".
    c.  Print your quilt using 1.6 for all your borders.

2.  Once I have  my printed sheet, I print the templates on hard card stock or heavy paper. I used to cut out more than one sheet at a time, but I found they weren’t very accurate so now I just cut one sheet at a time. Great TV work.
3.     After the hexagon templates have been cut out I punch a single hole in the middle (or as close to the middle as I can get). This helps when I am taking the templates out and is also an aide in basting.


Basting

1.     I usually cut my fabric on my Accuquilt Go! Using die #55011, I use the center die (3”). But if I were using fabric squares, I would use a 3-inch square and trim to fit the shape.


2.     I place my template
on the fabric and starting from the right side, I pull my knotted thread through the center of the template, (right through the punched hole,) and back through to the right side at the middle of the top edge of my template.


3.     I fold my first edge of fabric over, and the first right edge of fabric over and make a stitch on the first corner from right to left. (Of course you lefties would go to the left…) then fold next edges over to form corner and stitch again from right to left.


4.     Continue until you make the last corner and tie off!


5.     Your hexagon is basted. I have rarely needed to sew through the hexagon to baste it, and I just cut the knot at the center of the right side of my hexagon when I am ready to remove the papers. This single little stitch helps keep the template from shifting and I rarely need to pin.


Sewing hexagons together


1. Place 2 hexagons, right sides together.


2. Bury thread knot between the template and the seam allowance to make it easier to sew another hexagon to the corner.


3. using a matching thread, whip stitch the two edges together, keeping your threads tight so they are almost invisible.


Picture shows whip stitching, loosely stitched using a contrasting thread
so you could easily see the stitching.
When hexigons' are whip stitched together in matching thread and stitched tightly, the finished hexigons' should look somewhat like this


Monday, September 2, 2013

Summer Vacation is over... it's back to business

Did you miss me... I decided to take the summer off from my blog routine and get myself refocused.

Unfortunately, this was a terrible summer for me so its a good thing I had decided not to blog because you all would have ditched me! I am not going to bore you with all that went on, but I can just say, that a very good friend of mine said,... "Wow, I have never met anyone who has had as many disasters happen to them as you". Of course ... I cried! I had pretty much been crying all summer!

My beautiful new Daughter-in-law


On a Happy note... My son got married August 1st in Tulum, Mexico. The wedding was beautiful!!!!...


The weather in Mexico in August is HOT!!!! I swear the water in the ocean was warmer than most baths I have at home.


The month of July was a gong show! My son and Mariona got married in Toronto, legally, 2 weeks before we left for Mexico...
Dancing on the steps of Toronto's old City Hall

My sons best friend got married 1 week before we left for Mexico and that meant two new dresses... poor me!!!


Finding a dress for my son's wedding was difficult because it needed to be long and formal and I knew it was going to be hot!

That's me on the right in the teal dress.


I spent zero time in my sewing room in July and when we came home around the 8th of August, our world started slowly disintegrating. Again, not going to get into it! but still no real sewing!


I did manage to get my blocks done for June, July and August's "Get your Hex On" which is a little group I joined in July. I was late sending everyone their blocks, of course! But I am all caught up now.

June block
July Block
August Block
September is my turn at "Get your hex on" and I spent 3 days last week getting everything ready and mailed out. Thanks to my friend Sheila who just happened to be standing behind me at the post office when I discovered my wallet was at home on the table!!! More tears!

My block for September


She paid for my stamps, the blocks got mailed and I met up with her Friday to pay her back. What a crazy month August was, so believe me when I say... Thank God it is September.! Although I might be the only one happy about that!  LOL

My granddaughter ... hamming it up!


Tuesday, July 2, 2013

Put your Stamp On it Blog Hop


Somethings are not meant to be... This Blog Hop was one of those things for me!

First, I wasn't going to sign up for it! Then there was still some space available and I asked if I could be on the last day. That worked out, so I signed up.

Then I had a brain wabble...  no idea what I would do for this blog hop! Weeks went by and then...


My wonderful machine stopped working...


Then my sugars went out of wack and took my eyesight with it!


But don't give up on me just yet.  A commitment is a commitment...  and this WAS a commitment.


Here is how it all came together...

First, about a month ago I found this on one of my many blogs I follow...
http://sanfranciscostitchco.com/SpringSpellbinder2.html
The spring Spellbinder from this year


Which led to this...


http://sanfranciscostitchco.com/SpringSpellbinder.html


Which led to my inspiration for this blog hop...

The label for the Paris Spellbinder


This was my "Ah Huh' moment... I could use this to make my stamp, with a few minor changes... if my machine was working.  I almost cancelled this blog hop! Off to plan B... I would use my 730 which embroiders perfectly.

I started putting some ideas together. My son and his fiancee are getting married in less than a month and I could play around with all of these embroidery designs and come up with something that would work... so into Embird I went.


Well two weeks later... one week to go before my day at the hop,  I had three great ideas, one for each child, all ready to embroider. Luckily the problem with the "Beast" was minor, so I picked it up from the tech and put my ideas into motion...then for some strange reason my sugar went out of wack and I could barely see clearly... I almost cancelled my part in this blog hop again!

But I worked away, finishing up the embroideries at 11:37 pm July 2nd! So they are not quilted as I hoped they would be!

I have made 3 little wedding wall hangings. Each will measure about 8 1/2 x 11.

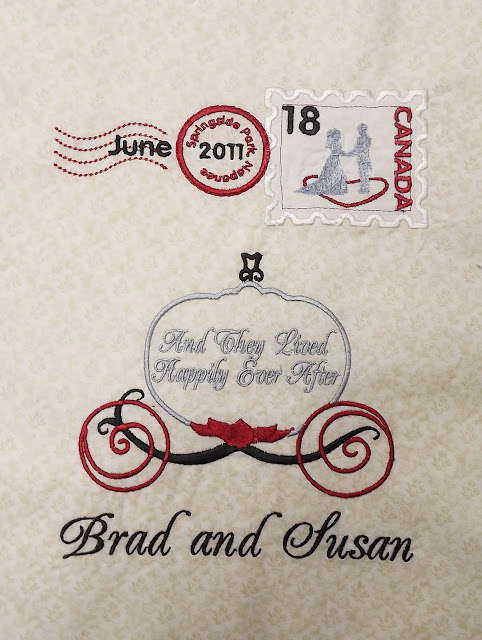
Two of the wall hangings have a theme. Each STAMP has the country they were married and the date. The cancellation has the month and the year as well as where they were married and the colours are the colours of the Bridal Party. The body of the hanging has a picture from their theme.

My son Scot and his wife Dee got married August 21, 2004 at a park near us. The bridesmaids wore fushia and black and carried Gerber Daisies, Dee's favorite flower.  The Gerber Daisy embroidery was a freebie from Zundt designs.


My daughter Susan and her husband were married on June 18, 2011 at the same park. The bridesmaids wore black and red.  Susan rode to the wedding in a Cinderella carriage; the embroidery came from Embroidery Library.

This is my family including 8 of my 9 grandchildren. The baby was off screaming somewhere.. LOL


The third, well that wedding hasn't happened yet... Kris and Mariona will be married August 1, this year in Mexico. The bridesmaids will wear a beautiful royal blue...


And the find that got all this started was the Spellbinder Paris, Eiffel Tower embroidery.

In October last year, Kris secretly planned a trip to take Mariona to Paris to get engaged under the tower.  A special moment for both of them.


Hopefully before I leave for Mexico, I will have all three quilted and ready to gift.  Or maybe they will be a wall hanging for me. Come back and check! Or follow me by email or bloglovin' so you won't miss the big reveal!  Right now... I am off to bed!

Thanks Mdm Samm for this "stressful" but fun blog hop and a special thanks to cheerleader Thearica from Pig Tales and Quilts  who came so close to scratching me off the list, but didn't have to.  Her encouragement kept this hop running smoothly!  Both of you worked so hard for the success of this hop and deserve lots of gratitude.

Don't forget the rest of my friends who are "putting their stamp" on today...  Here's the list!

Monday, July 1, 2013

Linking up to "A year of Finishes".. or not! I missed the link up by... 1 day!

Who knew!!!!


That I would have so many excuses why this quilt isn't finished...

The fact that I got sick during crunch time... you know... the time when you realize you only have a week to finish, but you have 6 months of work to do!

or/and

The time when you just get started and your machine goes on the blink! (Its back and it is sewing beautifully... lets hope it continues!)


But... I am really pleased with where I got to.

 I started this quilt in 2002 and I am really only a few days away from having it completed. As of the first of June, all the blocks and sashings had been embroidered and appliqued, but not sewn together and one long border had been appliquéd.


As of today, everything is sewn together...

All the blocks and borders were appliquéd and embroidered and 2 of 4 corners were appliquéd and embroidered...


And 1 of 4 corner butterflies has been embroidered...


The big reveal... Tada!


So much more work than I thought to finish up this quilt.  But with only a small portion of the work left to do, 3 or 4 more baseball games and I will have it finished! Go Jays Go! Thanks for the challenge!


My Favorite Tools... Sticky Stuff

I have a drawer, marked sticky stuff, that I TRY to keep all my sticky stuff in... And its full.

but not everything is my favourite...


But... Here are a few of my favourites...

First let me talk about ...

Elmers' Glue


I LOVE IT!
I am the queen of Elmers' Glue. I use it for everything.

  1. Sticking zippers in place before I sew them. 
  2. Applique
  3. Attaching Applique
  4. In piecing when I need something exactly where I want it to get nice points
  5. Attaching my bindings,
  6. And much much more.. 
I like the stick sometimes, but I mostly use the small pen or the regular bottle. I have tips for them, but mostly, I just adjust the caps to work the way I want them to. Quick tip. Press lightly with your iron to dry it faster. I have never had a problem with it not washing out or leaving any discolouration. 


Other Glues

I only ever use Roxanne's Glue Baste It!.  When I am doing a ton of appliqué, I like it because it drys quickly and I can turn edges in my chair while I watch TV. 


Sticky Labels

I use a lot of sticky labels. I need them to organize my stuff in boxes, drawers and shelves. I use the round ones on cut fabric, to remind me what size they are and I use the hole protectors to hold the ends of my threads on my slippery spools of embroidery thread!


Sprays

I am not a spray lover, but I do use 505 Basting Spray occasionally when I am quilting some little piece on my domestic machine. But what I really love are these spray handles that I found on someones blog a few months back... they are amazing to use, and easy to buy. Just look in the paint department of any hardware store!


Fusible Web


I love Misty Fuse. It is easy to use and I can use as little or as much as I want. And it has a very soft hand, your appliqués don't harden or get stiff. It is my favourite. I buy it by the meter and I don't think it is as expensive as other products.

Agent 007 works well for small areas you just need to permanently fuse! I don't use it much because it makes a huge mess but I use a little QTip to help me get it in place.


Household Glues and Tapes


I have lots of examples of household glues, but I have found that I like the E6000 the best for quick permanent gluing. 

Tape is tape, but I do look for the ones with the really sharp cutting edges. Nothing irritates me more than having tape twisting off the roller, as I am one handedly, trying to get a piece on a present I am wrapping or a pattern piece I am joining... Which reminds me... I really need to buy a tape dispenser! That will solve that problem!